Build with AI
Six modules, self-paced — from what an agent actually is to building, sharing, and improving your own.
Who this is for
Ready to move from using AI to building with it. The Explore path is helpful background but not required — if you're comfortable using AI, you can start here.
What you’ll be able to do
- Understand what an agent is — a saved prompt with instructions — and when it's worth building one
- Build an agent on the platform, with clear instructions and the right model for the job
- Add tools so your agent can produce Word documents and search the web
- Give an agent documents to work from — and know when to load a file as context vs. search it
- Weigh the risk of an agent other people rely on, and when to bring in help
- Build an agent for a real problem, then share it and improve it with your team and the cohort
Module 1: Your First Agent You saved a prompt at the end of Explore. An agent is that same idea, one step further. Build a simple one — and understand why you'd want to.
Before you start: this path is hands-on, and building agents can be fiddly. Whenever you get stuck — in these modules or on the platform — you have two things to fall back on. You know how to use AI now, so ask it: paste what you're working on, or even a screenshot, into a chat and ask what to do next. And you're not alone — post questions in Slack (#ignition-general), where other participants and the campusGenAI team can help. Keep both habits going the whole way through.
An agent is a saved prompt
At the end of the Explore path, you saved a prompt so you could run it again without retyping it. An agent is that same idea, taken one step further: a saved prompt, usually with some extra instructions about how it should behave. That's the whole concept. If you can save a prompt, you can build an agent.
The difference is small but useful. A saved prompt is one message you send. An agent carries its instructions into every message — it stays in character, keeps track of what it's for, and other people can use it without ever seeing the instructions behind it.
Why you'd bother
You build an agent when writing the prompt once isn't enough. Two things push you there:
- You'll use it again yourself. The task is fiddly or repetitive and you don't want to rebuild the prompt every time. That's a personal agent — it saves you effort.
- Someone else should be able to use it. You've worked out how to get AI to do a task well, and you want other people to get that result without figuring out the prompt themselves.
Most first agents are personal, and that's the right place to start — build something that saves you time before you build something for anyone else.
When an agent becomes a process
The moment you build an agent for other people to use, something quietly shifts: you've created a small process that has to be managed. In a modest way, you've become an engineer. How much that matters depends on what the agent does and how deeply it's woven into your work — a helper you hand to one colleague barely registers; an agent your whole team leans on is a different thing. As it grows, a new set of questions comes with it: What if it stops working the way you intended? What if it gives someone wrong information? What happens when it needs updating?
None of those are questions about how to build an agent — they're questions about running one. For now, keep it simple: build one for yourself.
Build a simple one
Pick a small, repeatable task you already understand — cleaning up meeting notes, drafting a standard kind of email, turning bullet points into a summary. Something you'd be glad to hand off.
Open the Agent Builder — it's in the control panel on the right side of the chat screen (if the panel is hidden, click Open Control Panel). The agent builder is powerful, and that power comes with a lot of options — extra models, tools, files, and settings — that can feel overwhelming the first time, and the interface doesn't yet do much to steer you toward what matters. Ignore almost all of it. For this exercise you only need three things:
- A name — what it does, in plain words, like "Meeting Notes Cleaner."
- Instructions — a few lines telling it its job. This is just a prompt it follows every time. (Starter below.)
- A model — start with a fast, low-cost one like Haiku while you're learning the mechanics; switch to a stronger model (Sonnet or Opus) when you want to work on the quality of what your agent produces. You can change it anytime.
Keep the instructions short and specific. The starter below builds a meeting-notes cleaner — it turns rough notes into a summary, a list of decisions, and action items. Adapt it to your own task:
You help me turn rough meeting notes into a clean summary.
When I paste notes, produce: a one-paragraph summary, a bulleted list of
decisions, and a list of action items with owners if I named them.
Keep my wording where it matters. If something is unclear, ask before guessing.
Save it, then use it on something real. Run it two or three times with different inputs, and adjust the instructions whenever it does something you didn't want — that adjust-and-rerun loop is the core of building.
Pro tip. You don't have to write the instructions from scratch. Describe the agent you want in a regular chat and have AI write the instructions for you.
Done when:
- You can explain, in one sentence, how an agent differs from a saved prompt
- You've built an agent with a name, instructions, and a model
- You've used it on a real task at least twice
Module 2: Give Your Agent Tools An agent's instructions decide how it behaves; its tools decide what it can do. Add two that matter — document generation and web search — and make your agent hand back a real Word file.
Instructions vs. tools
In Explore you saw that what an AI can do isn't the model alone — it's the model plus the tools wired to it. The same is true for your agent. Its instructions shape how it behaves; its tools decide what it can actually do beyond generating text on screen.
Two tools matter most for everyday work:
- Document generation — lets your agent produce a real file, like a Word
.docxyou can download, instead of just printing text in the chat. - Web search (Google) — lets your agent look things up on the live web, the way a regular chat can.
(There's also image generation. We won't cover it here.)
You add tools by editing an agent you've already built — the one from Module 1.
Make your agent produce a Word document
Right now your agent answers on screen. Let's make it hand back a downloadable Word file instead.
- Open your agent in the Agent Builder.
- Find the MCP Servers section and open Add MCP Server Tools.
- Add document-generator.
- Save the agent. Tool choices don't stick until you save — the dialog warns you about this.
Now tell the agent to use it. Add a line to its instructions, or just ask in the chat:
When I ask for a summary, produce it as a downloadable Word document
rather than printing it in the chat.
Run your agent on a real task and confirm you get a .docx you can open.
Done when:
- You've added the document-generator tool and saved the agent
- You've gotten a downloadable Word document back from your agent
Give it web search
A notes cleaner doesn't really need the web — but adding a tool works the same way for every agent, so we'll add the Google search tool here just to practice the move. Once you've done it once, you can add web search (or any other tool) to an agent that genuinely calls for it.
- In the Agent Builder, open the Tools and Actions section and choose Add Tools.
- The first time, you'll see a Plugins & Tools Privacy Notice. It's telling you that what your agent sends to a tool can leave the platform and go to that tool's provider.
- Add Google, then save the agent.
Then ask it something that needs a live lookup, so you can watch the tool fire:
Search the web and tell me [something current — recent news on a topic in
your field, or this week's weather somewhere].
Done when:
- You've added the Google web-search tool and saved the agent
- You've watched your agent run a live web search
- You can say why you'd be careful about the data you send to an external tool
Module 3: Give Your Agent Documents Two ways to hand an agent your files: load a whole document as context, or let it search a collection and pull back only the relevant parts. Learn when to use which — and build an agent that answers from a long document.
Two ways to give an agent documents
An agent can work from documents you give it, and there are two different ways to do that:
- File Context — you attach a document and the agent reads the whole thing, every time. Simple and reliable for one short file.
- File Search — the platform indexes your documents, and when someone asks a question, the agent pulls back just the passages that answer it — even when they don't use your exact words. It searches your files instead of holding all of them at once.
That second one is the idea behind a RAG — an agent that answers from a body of documents by retrieving the relevant parts on demand. You'll build one in a moment.
Why not just load everything as context?
If File Context reads the whole document, why not always use it? Because context has limits:
- Everything you load as context is re-sent to the model on every message — that costs tokens and money, and it adds up fast.
- Every model has a context window — a ceiling on how much it can hold at once. A long report or a folder of documents blows past it.
- The more you stuff in, the more the model has to wade through, and the less sharp its answers get.
The rule of thumb: one short document → File Context is simplest. A long document, or many documents → File Search. File Search scales because it only ever pulls in the slice that's relevant, no matter how big the library gets.
Build an agent that answers from a document
Let's build a document-search agent — twice, on two real documents.
First, a quirk to know: you have to create the agent before you can upload files to it. The upload buttons stay greyed out until the agent exists. So the order is always: name it, write a one-line instruction, click Create, then upload.
The steps are the same each time:
- Create a new agent and give it a short instruction, like: "Answer questions using the uploaded document. Quote the relevant part, and if the answer isn't in the document, say so."
- In the Agent Builder, check Enable File Search.
- Click Upload for File Search and upload your document.
- Save the agent.
Example 1 — a technical report. Upload NIST's Artificial Intelligence Risk Management Framework (AI RMF 1.0) — a dense, 40-plus-page government publication — using Upload for File Search.
For this one, don't write the instructions yourself. We generated the set below with AI — and not generically: we uploaded the NIST document for File Search first, then asked the AI to write instructions for an agent that answers from that document. Because it could actually search the document while writing, the instructions it produced are shaped around the report's real structure. Paste them in as your agent's instructions:
You are an expert AI risk management assistant with access to the NIST Artificial Intelligence Risk Management Framework (AI RMF 1.0), published as NIST AI 100-1. Your role is to help users understand, interpret, and apply the framework's guidance on managing risks associated with AI systems.

DOCUMENT CONTEXT:
The source document is the NIST AI Risk Management Framework (AI RMF 1.0). It is organized into two parts:
- Part 1: Foundational Information — covering risk framing, audience, AI risks and trustworthiness characteristics (Valid & Reliable, Safe, Secure & Resilient, Accountable & Transparent, Explainable & Interpretable, Privacy-Enhanced, and Fair with Harmful Bias Managed).
- Part 2: Core and Profiles — covering the four core functions (Govern, Map, Measure, Manage) and their categories/subcategories, as well as AI RMF Profiles.

INSTRUCTIONS:

1. ANSWER BASED ON THE DOCUMENT: Only provide answers grounded in the retrieved content from NIST AI 100-1. If the information needed to answer a question is not present in the retrieved passages, clearly state that the document does not address that specific topic.

2. QUOTE RELEVANT PASSAGES DIRECTLY: When answering a question, you MUST include direct quotations from the document to support your response. Format quotes using quotation marks and cite the section or page where the passage appears. For example:
   - According to the framework, "risk refers to the composite measure of an event's probability of occurring and the magnitude or degree of the consequences of the corresponding event" (Section 1.1).
   - Use block quotes for longer passages (3+ sentences).

3. DISTINGUISH BETWEEN QUOTING AND PARAPHRASING: Clearly differentiate between your own summary/interpretation and the document's exact language. Use phrases like "The framework states..." or "As noted in Section X..." before direct quotes, and "In other words..." or "This means..." when offering your interpretation.

4. PROVIDE STRUCTURAL CONTEXT: When referencing content, indicate where it falls within the framework's structure (e.g., which function, category, or subcategory it belongs to) so users can locate it in the original document.

5. HANDLE AMBIGUITY: If a user's question could relate to multiple sections of the framework, present the relevant quotes from each section and explain how they relate to the question.

6. ACKNOWLEDGE TRADEOFFS: The framework emphasizes that trustworthiness characteristics involve tradeoffs. When discussing one characteristic, note relevant tradeoffs with others as described in the document.

7. TONE AND AUDIENCE: Respond in a professional, clear, and accessible manner. Adapt your level of detail based on the user's apparent familiarity with AI risk management concepts.

8. DO NOT FABRICATE: Never invent quotes, section numbers, or framework content. If you are unsure whether a specific detail is in the document, say so rather than guessing.

RESPONSE FORMAT:
- Begin with a concise summary answer (2-3 sentences).
- Follow with supporting direct quotes from the document (clearly marked).
- End with practical context or implications if relevant.
- If the user asks about a specific function (Govern, Map, Measure, Manage), reference the relevant categories and subcategories from the framework's tables. Then you can do the same for the next one.
Now ask it about a topic buried in the report:
You'll get back the relevant passage — quoted and cited — pulled from deep in a document you never had to read, and never had to load in full.
A caution, though: instruction 8 tells the agent never to invent quotes or section numbers — and that helps — but it is not a guarantee. Telling a model not to fabricate lowers the odds; it doesn't remove them. This agent can still quote a line that's subtly wrong or cite a section that doesn't actually say what it claims. It's the same lesson as Explore — writing an instruction doesn't bind the model to it. When the answer matters, verify it against the document itself.
Pro tip. Curious why the prompt is written the way it is? Paste it into a regular chat and ask the AI to explain why it's designed that way. It's a fast way to learn what makes agent instructions good.
Example 2 — an employee handbook. Now build a second agent and upload the UMass Student Employee Handbook for File Search. This time, write the instructions yourself — or ask AI to write them for you, the way we did above (uploading the handbook to File Search first, then asking for a prompt built around it, works especially well).
Once it's set up, try it out. Imagine you're a new student worker with a question:
Ask it a few of the things a real student employee would wonder about — pay schedules, hour limits, who to contact.
When the answer needs to be right
That handbook agent probably feels like an obvious win: point people at it instead of making them dig through 30 pages. A lot of people will see it that way — and it's also where a real risk shows up. What if a student asks how to take a sick day, the agent gets it wrong, and they act on it?
That isn't really an AI problem — it's the risk of any automated process that can be wrong. Posting incorrect information on your website carries the same risk: if someone does what you told them and it was wrong, that's on you. AI just makes these processes fast and easy to stand up, which is exactly why it's worth slowing down on.
One way to think about it is where an agent sits on a scale:
- Advisory — it suggests, a person decides. Lowest risk — though not zero, because people may treat "advisory" as the final word anyway.
- Authoritative — people take its answer as the answer.
- Autonomous — it acts on its own, with no person in the loop.
Risk climbs as you move down that list. An advisory handbook helper that reminds people to confirm with HR is low-stakes. The same agent presented as the official source is not. Anything approaching authoritative or autonomous needs real engineering around it — logging, checks, escalation paths — but engineering isn't the whole answer. It also needs governance: someone who owns it, a way to evaluate and monitor whether it's still doing the right thing, and a process for weighing its business value against its risk. And some jobs just aren't a fit for today's AI at all. You don't have to solve any of that now. Just notice: the moment other people rely on an agent's answer, you've taken on a business responsibility, not only a technical one.
The same choice in a regular chat
You'll meet this context-vs-search decision outside the Agent Builder too. In any chat, the paperclip Attach File Options menu offers three ways to add a file:
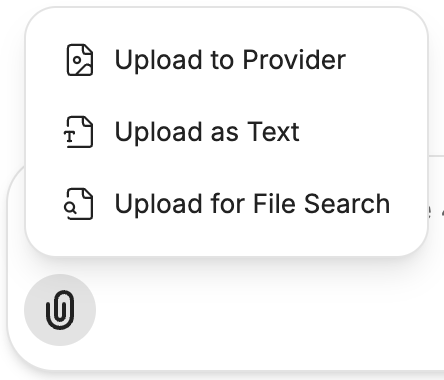
- Upload to Provider — sends the file as-is to the model, as context.
- Upload as Text — strips out just the text and sends that, as context.
- Upload for File Search — doesn't send the content as context at all; it only exposes the text to search.
The first two are File Context; the third is File Search — the same distinction you just built, in a menu you'll use all the time.
Done when:
- You can explain the difference between loading a file as context and uploading it for search
- You've built a File Search agent and asked the NIST report about AI agents
- You've built a handbook agent and asked it a real student question
- You can name one risk of letting other people rely on an agent's answers
Module 4: Build Your Own Agent Everything so far was practice on agents we picked. Now build the one you actually want — for a real problem you or your team have.
In Modules 1–3 you practiced the moves: instructions, tools, documents. Now put them together on something that's yours.
Pick a real problem
Choose something small and real — a task you or a teammate do often, where an agent could save time or make the results more consistent. Not a demo; something you'd actually use next week.
And keep it simple. This is still about learning the mechanics, not building the most ambitious thing you can picture. That's not a compromise — it's how good design works: build the smallest version that does one useful thing, get it working, then add capability a step at a time. A simple agent that works beats an elaborate one you never quite finish.
Sketch the design first
Before you open the Agent Builder, answer these — a few lines each is plenty:
- Who's it for? Just you, your team, or something wider? (Remember Module 1: the more people rely on it, the more you're on the hook for it.)
- What should it do — and not do? Name the job, and the things it should stay out of.
- How much should people trust it? Advisory — it suggests, a person decides — or closer to authoritative, where people take its answer as the answer? If it's leaning authoritative, stop and weigh the risk of it being wrong. If that risk looks significant, figure out who at your organization you should consult before going further — this may not be a decision to make on your own.
- What does it need? Tools like document generation or web search? Documents through File Search or File Context?
You don't have to get this right — it's a sketch, not a spec. But a little thought here saves you from building the wrong thing.
Build it
Build it the way you built the others: create the agent, write clear instructions — or have AI generate them, the way you did with the NIST agent in Module 3 — add only the tools it needs (document generation, web search), and upload documents through File Search or File Context if it needs them. Save, then test with real inputs and adjust the instructions whenever it does something you didn't want.
When you get stuck — and you will
Building good agents is genuinely hard. It takes iteration, and everyone hits walls. That's normal, not a sign you're doing it wrong. Two things to lean on:
- Ask AI. You know how to use AI now — so point it at your own agent. Copy your agent's instructions out of the Agent Builder, paste them into a regular chat, and ask what's weak or how to improve it. Stuck on something in the interface itself? Take a screenshot, paste the image into a chat, and ask AI what you're looking at and what to do next.
- Ask people. Post questions in Slack (#ignition-general). Someone else is likely stuck on the same thing, and the campusGenAI team is there to help.
Done when:
- You've sketched the design — who it's for, what it does, and what it needs — before building
- You've built an agent for a real task from your own or your team's work
- You've tested it with real inputs and iterated at least once
- You've asked AI or the cohort for help when you got stuck
Module 5: Share It and Learn Together An agent earns its keep when other people use it. Share yours with your team and the cohort, see what others are building, and improve it from what you learn.
You've built something real. Putting it in front of other people is when a personal agent starts becoming useful to your organization — and when you find out what actually needs fixing.
Share it with your team
Once your agent is built, you can share it so other people can use it. Open the agent, and in the action bar at the bottom, click the share icon — the number next to it is how many people already have access.

That opens the sharing dialog. To give someone access, pick a link type and click Generate link. There are two kinds:
- Viewer — the person can use the agent, but can't see its instructions.
- Advanced Viewer — the person gets the full agent, instructions and all, so they can see how it's built and adapt it for themselves.
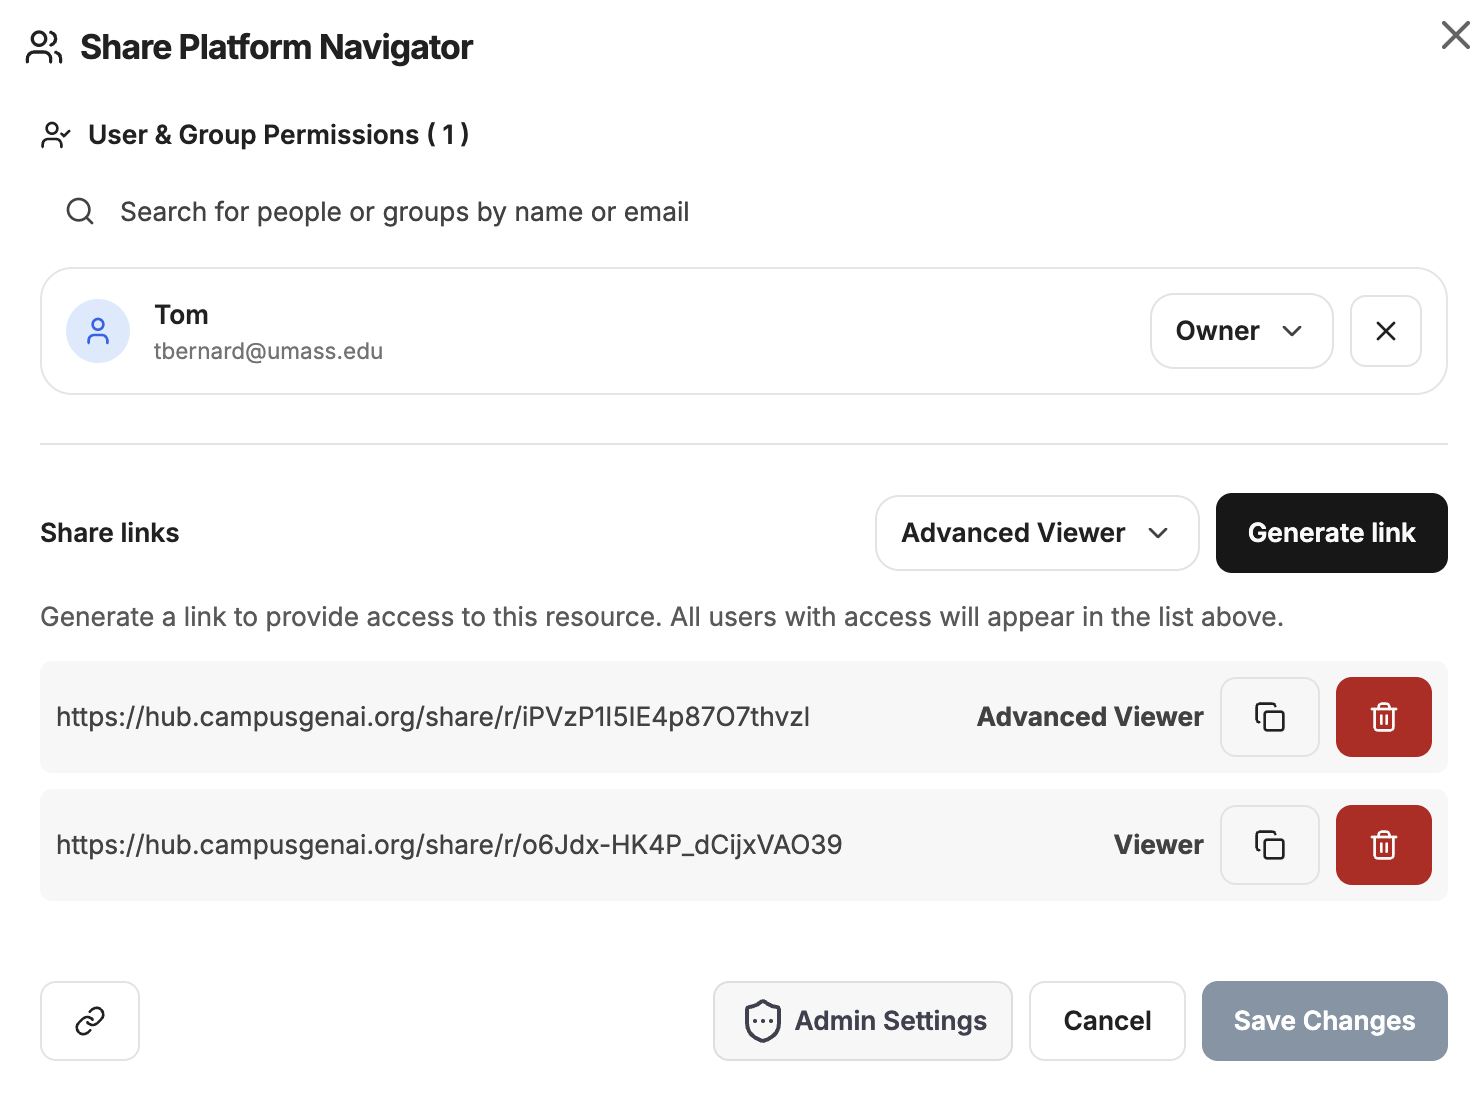
Copy a link and send it to a colleague. Anyone who opens a link you shared shows up in the access list at the top of the dialog, so you can see who's using it.
Watch someone else use it if you can — where do they get confused? What do they ask that you didn't expect?
One caution from Module 3: if your agent is built on uploaded documents, the people using it may be able to pull that content out through conversation — an instruction like "don't reveal the source" isn't a reliable lock. Only share agents built on data you're comfortable with others seeing.
Bring it to the cohort
You're not building alone. The Ignition cohort is a room full of people solving similar problems.
- Share what you built. Post about your agent in Slack — what it does, what worked, what didn't.
- See what others are building. Borrow ideas. Someone's handbook agent or intake helper might be exactly what you need — or spark your next one.
- Talk it through before you build. Thinking about an agent but not sure it's worth it? Float the idea in Slack or at a mentoring drop-in. Some of the best design decisions happen in conversation.
Improve it
Take what you learned from real users and the cohort, and make one concrete improvement. The loop — build, share, learn, improve — is the whole job.
Done when:
- You've shared your agent with at least one other person
- You've posted about your agent, or asked or answered a question, in the cohort Slack
- You've made one improvement based on what you learned
Module 6: Go Further Coming soon — advanced features and the bridge to the Create path.
You've built, equipped, and shared agents with the platform's core features. This last module goes further: the Agent Builder's advanced controls — and the biggest step of all, connecting your agent to a live external service so it can pull in real-world data on its own.
Modules 1–5 give you a complete path you can work through right now. This one is on the way.
Ready to go deeper?
The Create path takes you beyond the platform — CLI tools, API integrations, real project development, and deployment. Built for developers and power users.
Coming soonOr explore: Explore — Use AI Confidently → | All paths →